Wednesday, May 25, 2011

Recipe #12 - Salt and Pepper Salmon


http://www.foodnetwork.com/recipes/tyler-florence/salt-and-pepper-salmon-recipe/index.html

I usually don't like to start out with a picture of the finished product, but I couldn't help myself because this looked so good.  The orange hues of the the crispy top with the pale pink middle atop a bed of red bliss potatoes with peas and onions......but I'm getting way ahead of myself so let's start at the beginning.

It was a Tuesday night in mid May and I hadn't even blogged about the last recipe, "Chicken Parmesan #11," but I was in the mood for fish and figured it wouldn't take too long to make.  Tyler's recipe says it takes about 30 minutes.  I've learned that if I double the time, that's about how long it really takes to make the dish.  So an hour to cook dinner on a school night is manageable.

I decided to pick up the majority of the ingredients from Whole Foods.  It was a little more expensive than my usually Stop and Shop, but the quality of their fish is worth it.  I also feel that the fishmongers (love that word) know more about how to cut the fillet.  So many times I've ended up getting the end of the fish which is thin and cooks too fast.  Not at whole foods!  They gave me a nice middle thick cut which I think you'll need for this recipe.

Anywho, enough free advertising for whole foods.  They don't sponsor me.....yet.


Ingredients from left to right include but are not limited to, curly parsley, watercress, baby dill, lemons, red bliss potatoes, and the salmon wrapped up nicely in some fish paper.  Is it called fish paper?  Maybe it's called meat and fish paper since I think they wrap up meat in it too.  Not that it's really important to any of this but I felt like throwing those questions out there.    And I see you frozen green peas.  You can't hide from me.   


Before doing anything with the Salmon you'll want to make the smashed (not mashed) potatoes.  Tyler doesn't tell you this so if you were to just follow the recipe from the top you'd end up making the Salmon and then letting it sit and get cold while you make the potatoes. 

I cut them into quarters so they would cook quickly.  Toss them in a pot and cover with cold water and bring to boil.

Just in case you didn't know what potatoes in water look like.  Now you know and according to GI Joe, knowing is half the battle.  What is the other half?  Did they ever tell you?  I'm guessing it's knife skills, bow skills, shooting skills....and so on.
 
While the potatoes are cooking get the other ingredients for the potatoes ready.   
Lemon slices, Parsley, Dill, Lemon Zest and Watercress.  I don't think I was supposed to chop the watercress but it was too late, so I just mixed it all in.
Start cooking the pearl onions and lemon juice in a pan of olive oil and butter.   Add the peas and lemon slices and whatever else Mr. F tells you to do in the recipe. 

If you look closely or from far away you will not see any pearl onions.  You know why?  Because I can't find pearl onions anywhere!  I went to whole foods and did they have any?  No.  So maybe up in the Northeast we don't use pearl onions so no one carries them.  Please let me know if you see them anywhere.  Frozen, fresh, 2 weeks old.  Any pearl onion sightings will be appreciated.   Oh and by the way, I used a regular onion chopped up.
When the potatoes are done, fork tender, strain them and peel off as much of the skin as possible.  Be careful cause they will be hot.  Use a fork to hold them and peel with a little knife or your fingers if you have a high tolerance for pain.  When the vegetable mixture is done, pour them over the potatoes, season with salt and pepper, a little olive oil, and cover to keep warm while you make the salmon. 

Here comes the easy part.  Cut your salmon filet into whatever size portion you want.  Something like 4 inches wide is about right I think.  Sprinkle with kosher salt (thank you rabbi), and let sit while you heat some olive oil in a large pan.  

Hello salted salmon.

Season the salmon with pepper and rub some butter onto the skin side.  This will help it get crispy and not stick to the pan. When the pan is smoking (not burning) add the salmon skin side down and cook for about 6 minutes.  You'll see the salmon changing color from bottom to top.  

Color starting to change.  Should have taken a video of this to demonstrate the coolness of it.  But you get the idea.

After about 6 minutes or when most of the salmon has cooked, flip it over and cook the top for about 2 minutes.  

Crispy skin!  I never liked salmon skin until I had it this way.  Is it bad for you like chicken skin?  I hope not cause I ate it all and even some of the wife's.

Remove from the pan and place on a bed of smashed potatoes.  


I'm going to let this picture speak for itself, but since pictures can't speak I'll write what I think it would say. "I love how the colors or orange, pink, greens, purples combine to create a dish fit for a fine dining establishment!" 

And I'd have to agree with the speaking picture.  I was very impressed with how this dish came out.  Fairly easy to make, presents very professionally and tastes even better than it looks.  Best salmon I've ever made or had.  Crispy on the outside and melt in your mouth inside.  Be careful not to overcook it as it could get dry.  Always better to undercook salmon in my opinion.

Pair with a nice Pinot Grigio or a fruity Riesling and you're got a meal to impress your family and friends.

I would give this my 4 clean plates award but there were only two of us so I give it the 2 clean plate award!  You might think that this is like giving something 2 out of 4 stars, but it's not.  Just go with me on it.

Next up:
Chicken and Pineapple Skewers
http://www.foodnetwork.com/recipes/tyler-florence/stuffed-bacon-cheeseburgers-recipe/index.html


Wednesday, May 18, 2011

Recipe #11 - Chicken Parmesan

http://www.foodnetwork.com/recipes/tyler-florence/chicken-parmesan-recipe/index.html

10 recipes down and only 90 to go which brings us to lucky number 11.  I decided on an all time favorite of my wife, Chicken Parmesan.  I enjoy it as well but I consider her a connoisseur of the breaded chicken with tomatoes and cheese.   And also joining me on this adventure is another connoisseur of the parm, my good friend Josh.  We've known each other for about 30 years and chicken parm has also been his go-to meal.  Whether served in a roll or with pasta I imagine most people love the parm so let's see if this lives up to their standards.

Before going forward I think it's important to get a history lesson.  And what better way to learn history than from Wikipedia, a free site where anyone can put anything they want on there and anyone else can update and change it.   Here's the link to the Parmigiana:

http://en.wikipedia.org/wiki/Parmigiana

I first noticed that Tyler spells his recipe "Parmesan" where the traditional spelling is "Parmigiana".  And here's a brief explanation on the discrepancy:


There are several conflicting theories for the origin of the name parmigiana.
One common theory attributes the name to the use of Parmigiano-Reggiano (Parmesan cheese).[3]
Another theory attributes the name to an alteration of the Sicilian word parmiciana:

As with Parmigiano-Reggiano cheese, the word Parmigiana is often rendered, incorrectly, as "Parmesan" in English-speaking countries, from the French word for "from Parma."

So I guess I'm making the "English" version.

And as far as the origin of the dish. here's your history lesson:

The dish is claimed by both Campania and Sicily. While "parmigiana" usually means "from Parma" (in Northern Italy), the dish is not part of Parma cuisine. It is based upon melanzane alla parmigiana (alt. parmigiana di melanzane) or eggplant parmigiana (or eggplant Parmesan), a classic Southern Italian dish.

Now that we have that out of the way boys and girls, we can continue with the recipe.

Most of the ingredients minus the chicken.  Didn't feel like I needed to show you a package of chicken breasts.  If you really want to see a package of chicken breasts, go to your local grocer or supermarket and stand in the meat department.  You'll eventually see one. 

We begin making the sauce.  I strongly believe that the sauce is what sets apart your average pizza/sub shop chicken parm with a homemade or good Italian restaurant parm.  Anyone can bread and fry chicken, but the taste of this dish comes from the herbs, spices, tomatoes, and whatever else you put in there.  And after making the sauce from scratch it will be hard to go back to sauce in a jar (Even though I still do it because it saves time and there are some pretty good ones out there).

We start the base of the sauce by chopping onions and garlic like this.

Pretty cool, huh?  Figured I needed some animations to keep the kids happy.


 Add them to some olive oil in a good sized sauce pan or skillet and let them get to know each other until softened.

This one might start to move if you stare at it long enough.

 At this point you are supposed to add the olives.  I don't care for olives so I didn't get any.  If you like olives, by all means, add the olives, but if you don't just leave them out.  After adding the tomatoes and mixing it all up you'll get something like this.

Looking pretty good.  Reminds me of Christmas with the reds, greens and whites.   "Hey! Chingedy ching, (hee-haw, hee-haw)It's Dominick the donkey. Chingedy ching,(hee-haw, hee-haw) The Italian Christmas donkey."

Add some salt pepper and sugar and you're pretty much done with the sauce.  Let it cook on low or simmer while you make the cutlets.  

Before pounding your meat, I advise that you get wide shallow bowls.  Fill with flour, egg wash and breadcrumbs like so.

3 different vessels.  Pasta bowl, regular bowl, and plate.  It's not pretty but use whatever you have that will hold the ingredients.  If you're like me, you'll end up making a mess anyways.  


Now it's time to work those muscles!  Place the chicken breast between plastic wrap and pound that breast until about 1/2 inch thick or thin.

Another amazing animation!  Make sure to use the flat end of the meat mallet. No need to tenderize the breast. If you don't have a meat mallet, you can use a hammer, a can, a heavy book, your fists, your head, rolling pin, 2x4, or anything that might flatten the chicken without destroying it.


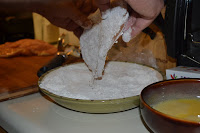
Now it's time to bread the chicken.  The order is flour, eggs, and breadcrumbs. 

And when you're done they will look like this

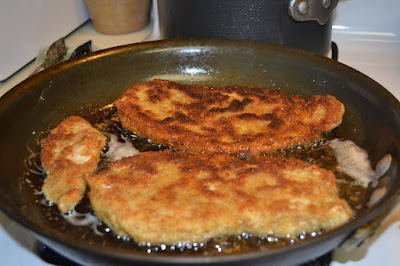
Cooking in some olive oil.  Could only fit two at a time. 

And your fingers will look like this!

Yum!
Cook about 5 minutes on each side until nicely browned.


Since I couldn't fit all the chicken in the pan I cooked it in two batches and decided to bake the parm in a casserole dish.  Tyler says to do it in the pan but you'd need a pretty big pan to fit it all.  So I put the chicken on the bottom, covered with the sauce, layered with slices of fresh mozzarella, fresh grated Parmesan, and jar grated parmesan cheese.  Top it off with some torn up fresh basil.

Before the oven.
And in about 15 minutes you're done!

After the oven.
I served this with spaghetti and garlic bread.  

Garlic bread two ways.  Butter and Olive Oil.  Bread appears in this blog courtesy of Jenn. Thanks Jenn!

A generous helping of chicken parm served on a bed of spaghetti with a slice of garlic bread. 
This is by far one of the best chicken parms I've ever had.  Sweet tomato sauce with a plethora of melted cheeses surround the crispy breaded chicken with the support of the spaghetti.  Pair this with a nice red wine, sit back and enjoy!  

There was plenty of food for 4 of us with a serving or two left over.  Everyone enjoyed it or they at least told me they did.  Special thanks to my wife and good friends, Josh and Jenn.  

Once again the coveted 4 clean plate award will be given to this meal.


And it feels wrong to finish the blog without a pic of the little one so here she is supporting the Bruins in their search for the cup!

Go Bruins!

Next up:
Salt and Pepper Salmon

Thursday, May 12, 2011

Recipe #10 - Chicken Kebab Salad

http://www.foodnetwork.com/recipes/tyler-florence/chicken-kebab-salad-recipe/index.html

It's been a few weeks since my last entry and it's probably due to the fact that I didn't enjoy this recipe.  1 out of 10 isn't so bad.  If I can cook 100 Tyler recipe and only 10 upset me then I'll be happy.  But I'll tell you this readers, I was not happy during the making of this meal.

Maybe it was the fact that I decided to attempt this on a weeknight where all my other recipes have been cooked on a weekend.  Did I have a bad day at work?  Stressed out about high gas prices?  Could have been a combination of many things and the fact that I'm writing this a few weeks after I made the dish, I really can't recall.

So anyways, let's get started and see what caused the Chicken Kebab Recipe to fail me.

Quite a few ingredients.  Chicken, Sausage, chicken sausage (optional), anchovies, french bread, rebecca romaine lettuce, lemons, bay leaves, Parmesan cheese.  Ok well it's not that many ingredients but it seemed like a lot.

The recipe calls for 8 links of pork sausage but since the wife and our special guest Michelle do not eat pork sausage, I bought 4 chicken sausage and 4 pork.  Now before you go running out to your grocer and buy 8 links of sausage, you should be warned that unless you want a mound of leftover sausage (see below), you can get by with 4 total.

Mound of leftover sausage.  Looks pretty good but there was just too much of it for the recipe. 

The recipe in itself is pretty straight forward, but I feel like I could have made the same dish with less steps and hassle. Tyler has you cut up the chicken, the sausage, and the bread and put it together on skewers like so.
My super fast knife skills.  Don't stare at it for too long or you will go blind.....just temporarily.

Bread, chicken, bay leaf, sausage and repeat.  Always repeat. 

Then you put on some salt, pepper, olive oil and lemon juice and put them on the grill.


Flaming kebabs.  Notice the mound of sausage on the right. 
And while the kebabs are cooking you have to make the dressing which is probably where I started to panic.  When I'm grilling I don't like to be distracted.  And making this dressing was a distraction.  I need to be near the grill and ready to flip or turn at any given moment.   Thankfully Michelle was able to help with the dressing and other assorted tasks or I might have just given up completely and ordered a pizza.

So after the dressing was done, I went back to the grill to find most of the bread blackened along with undercooked sausage and chicken.  How can Mr. Tyler think that you can cook chicken and sausage the same time that it takes to cook raw meat?!  And here is my biggest issue with this recipe.  Why even put these on skewers when you are going to be taking them off and mixing them into a salad?!  A friggin waste of of time and efficiency!  

Just continued to make me mad and I don't get mad easily, especially while I'm cooking.  I like to cook for the creativity and relaxation.  This recipe offered little of that.  If I was to do this again, and I might, I would cook the chicken and sausage on the grill, toast the bread in the oven, and combine it all without any god damn skewers!

Anywho, if you're still reading this and want to know how it came out, it was pretty good.  Big thanks to Michelle for putting it all together when I decided to give up on life.


The finished salad.  Looks tasty and well mixed.


So for taste I'd still like to give this recipe 4 clean plates but I just can't do it.  So I give this recipe a confused baby face.

I don't get it?!

Next up :  Chicken Parmesan
http://www.foodnetwork.com/recipes/tyler-florence/chicken-parmesan-recipe/index.html